
Hey trader,
Did markets flash crash?
Friday, in the last minute before the close, the S&P 500 swept through 730 and briefly printed near 717.
It looked like a crash. It wasn’t. It was dealer hedging.
And it helped me lock in a nice profit off a spread I had built hours earlier.
0DTE options seem scary to a lot of folks. They can certainly be tricky.
But there is a way to trade it.
I start by using the options market to define key price levels.
From there, I craft trades that match the idea and the environment. In this case, it was a vertical spread.
You may be familiar with option spreads. And you may be familiar with key support and resistance levels.
But today, I’m going to show you how to put those two together to create powerful 0DTE trades.
Start By Reading The Level
The trade begins with a level, not a chart pattern. On a 0DTE session, I hunt for one strike carrying an unusually heavy stack of open interest.
Friday, the strike was 733. It held somewhere around 30,000 to 40,000 contracts, split fairly evenly between calls and puts.
That was far more open interest than any of the strikes.
A level that crowded acts like a magnet.
The firms hedging all those options have to keep buying dips and selling rallies to stay balanced, which is what traders call positive gamma.
That constant two-way hedging pins price to the strike. The bigger the open interest, the stronger the pull.
So the first job is simple: Find the strike with the size, because that is where price wants to settle into the close.
Build A Spread So Your Risk Is Fixed
Once I have the level, I build a defined-risk spread around it. A spread caps both what I can lose and what I can make, and that cap is the whole point.
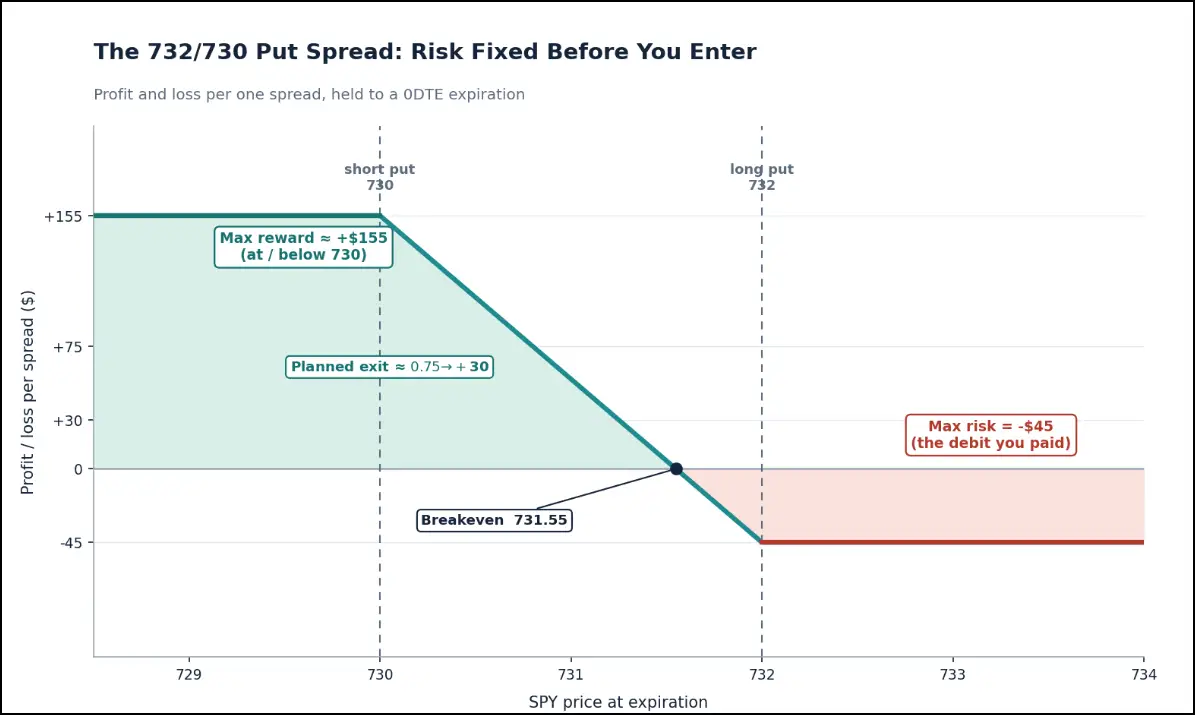
Friday I bought the 732 put and sold the 730 put. That structure gains value as price falls from 732 toward 730.
I paid about $0.45 for it. That debit was my entire risk, fixed the moment I entered.
The distance between the strikes sets the reward. Two dollars wide, minus the $0.45 I paid, leaves about $1.55 of profit if price settles at or below 730.
Here is the same trade drawn as a payout, capped on the loss side and capped on the gain side.
- Setup: a heavy 0DTE strike, 733 on Friday, holding 30,000 to 40,000 contracts with positive gamma pinning price to it
- Structure: long the 732 put, short the 730 put, a bear put spread for about a $0.45 debit
- Max risk: the debit, about $45 per spread, known at entry
- Max reward: the $2 width minus the debit, about $155 per spread if price settles at or below 730
- Breakeven: about 731.55, the long strike minus the debit
- Planned exit: near $0.75, roughly a $30 gain, as price drifts into 730
Plan Both Exits Before You Enter
Before I commit, I decide where I am getting out. On this kind of trade, price can hand me the gain two different ways.
The first is the quiet one. Price drifts down into 730 as the pin pulls it, and I sell the spread into that drift near my $0.75 target.
The second is faster, and it comes from what sits below the level. Under 733, the market flips into negative gamma, where hedging amplifies a move instead of calming it.
In that pocket, dealers sell into weakness, and their own selling feeds the decline. A break can travel much further than the gentle drift I planned for.
Friday handed me the second version. The pin failed, price swept through 730 in the final minute, and my resting $0.75 limit filled instantly.
I could not have clicked fast enough to manage that by hand. The limit order sitting there is what captured the move.
Why This Repeats Every Day
None of this needed a forecast. I read where the size sat, built a spread with fixed risk, and let the dealers’ own hedging do the work.
That last-minute drop looked dramatic on the tape. The cause was mechanical, and price snapped back almost as fast once expiration passed and the forced hedging stopped.
This is the part you can repeat. Every expiration builds a heavy strike, every heavy strike pins price, and every pin can break into the negative gamma below it.
Find the level. Define the risk.
Plan both exits, then let the structure carry it. The Console shows me the prints and the gamma map shows me where dealers are boxed in, and from there it is the same play, run again and again.
Brandon Chapman, CMT
Creator of Ghost Prints