
Hey trader,
10% Club had a FANTASTIC morning all thanks to gold.
The yellow metal shot higher this morning.
A beautiful setup formed…but it wasn’t quite right.
So, I waited. Minutes later, a second setup appeared. We took that one, and it paid out handsomely.
The difference between the two setups came down to risk vs reward.
No, the market doesn’t care about my entries or exits. However, I choose when and where to take my stand.
And today’s setups are the perfect examples that illustrate this point.
Let’s walk through them so you can see how my trade selection process works.
Because in my years of trading, nothing is more important than risk management.
So, let’s dive in.
The yellow metal came out swinging
Gold moved hard overnight. A lot of that came from tariff headlines, including talk of 250% tariffs on Canada.
By the time the bell rang, gold had already broken out and slammed right back to the zero line.
I love a market that moves. I do not love reacting to the first candle in one.
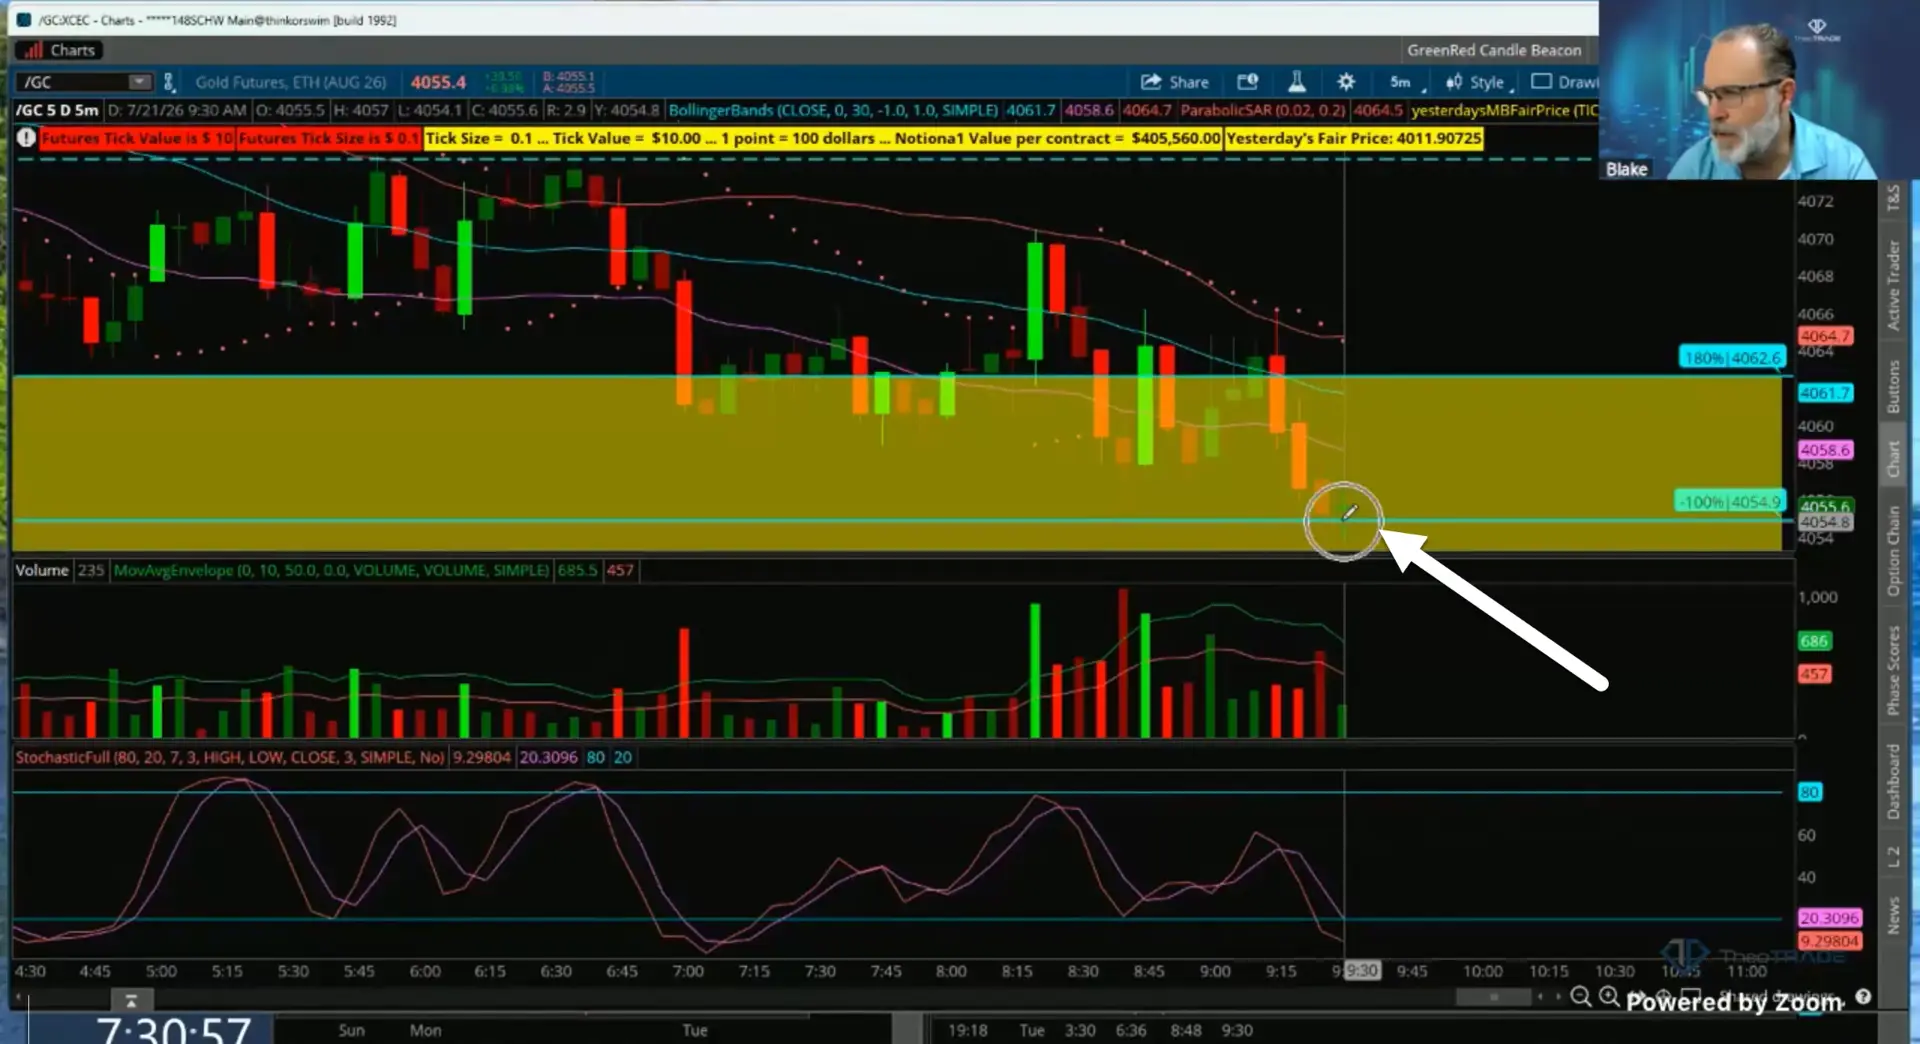
Those wide, jumpy candles come with a cost. The spreads widen and gaps open up between prices.
That is exactly why my entry ended up mattering as much as the signal today. I’ll get to that shortly.
The first setup that wasn’t quite right
Gold gave me a beacon signal first. It was clean, and on most mornings I take it without a second thought.
The trouble was the target. It sat up at 4074, and gold had already run most of the way there before the signal even fired.
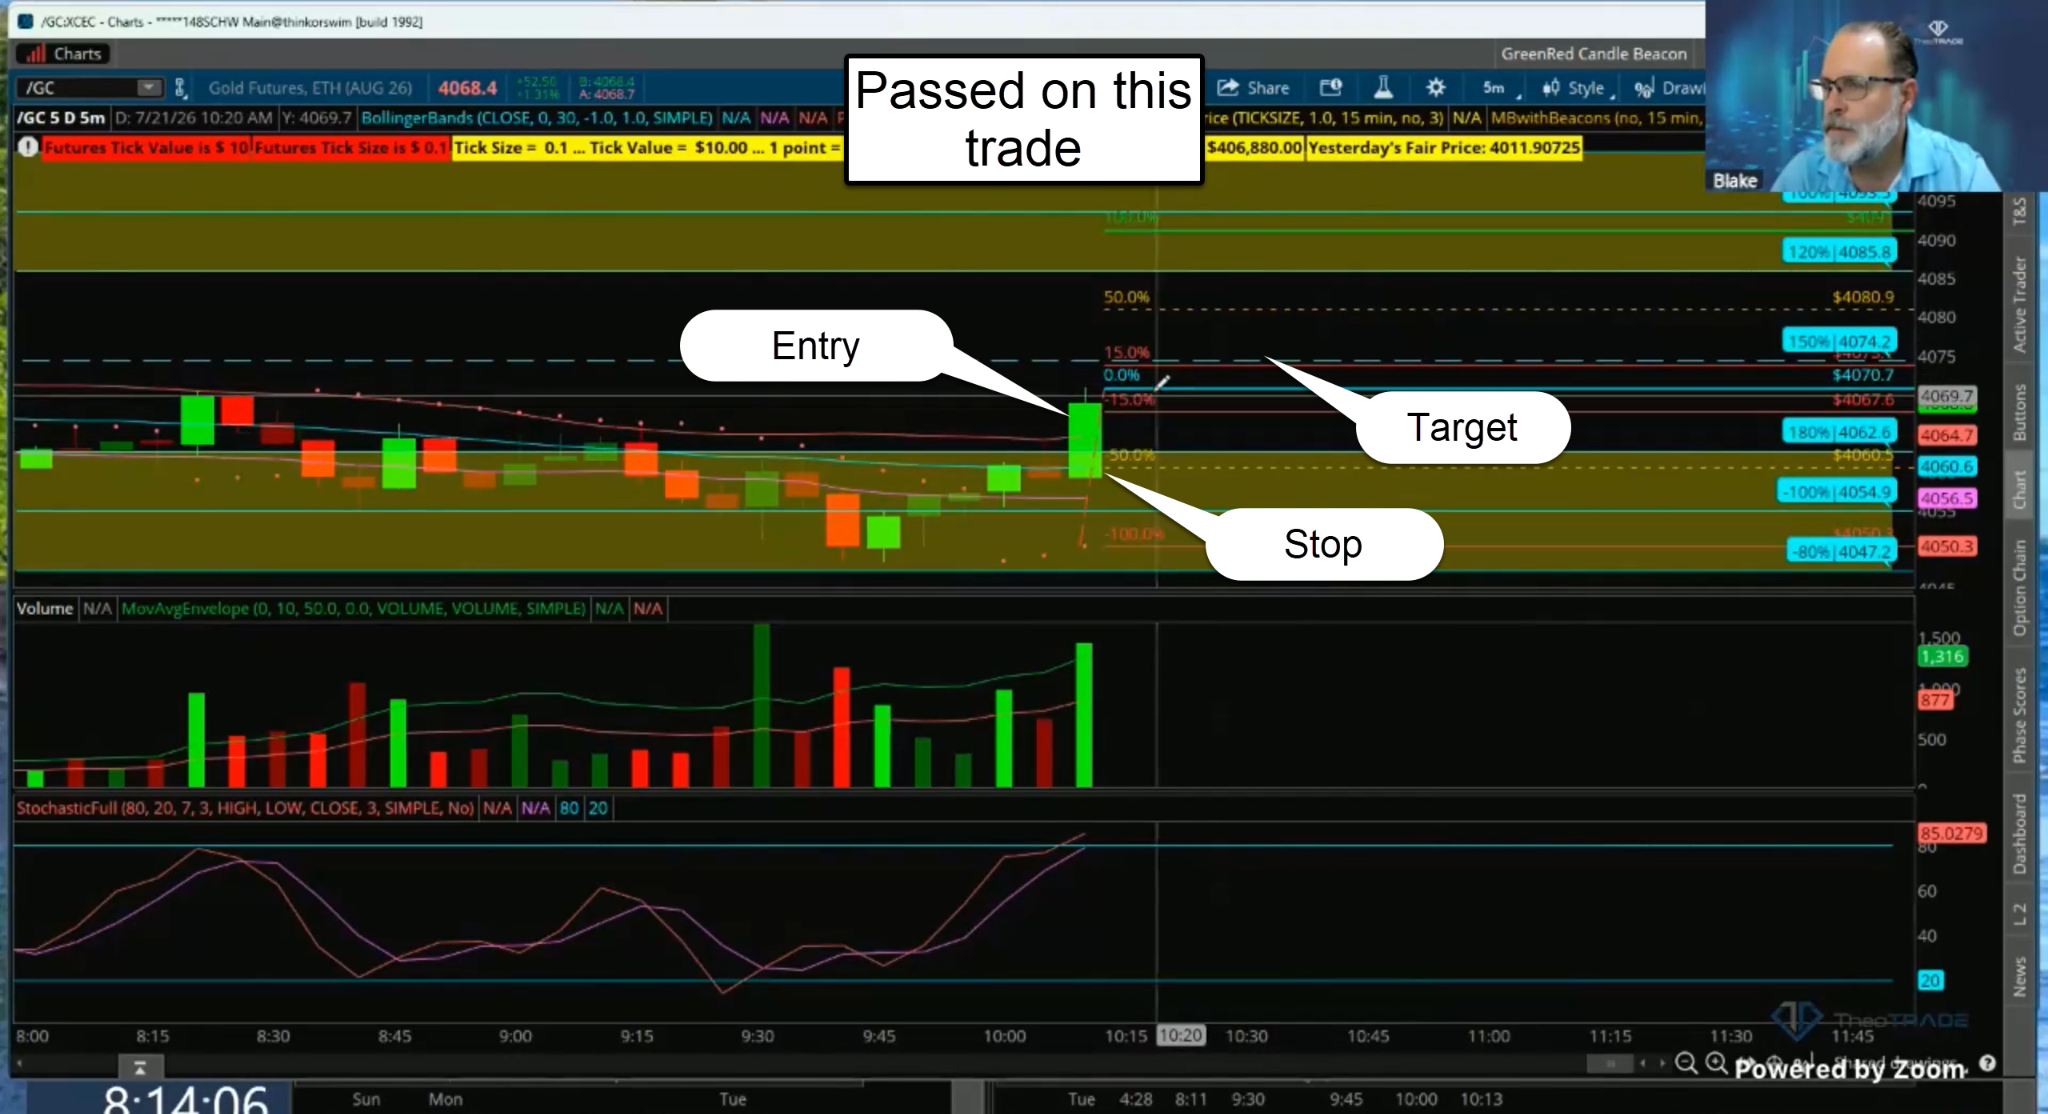
So the reward left on that trade was tiny. The risk was the same as always.
I said it out loud in the room. It was a valid beacon, just too close to its target to be worth taking.
That is the moment where discipline earns its keep. A signal firing is not a reason to click.
The setup I actually took
Minutes later, gold set up a Bollinger Band breakout. This one pointed at a target way up at 4080, and I extended it out to 4090.7.
That gave me real distance to work with. The move was also big and heavy on volume, with one candle alone risking about 10.9 points
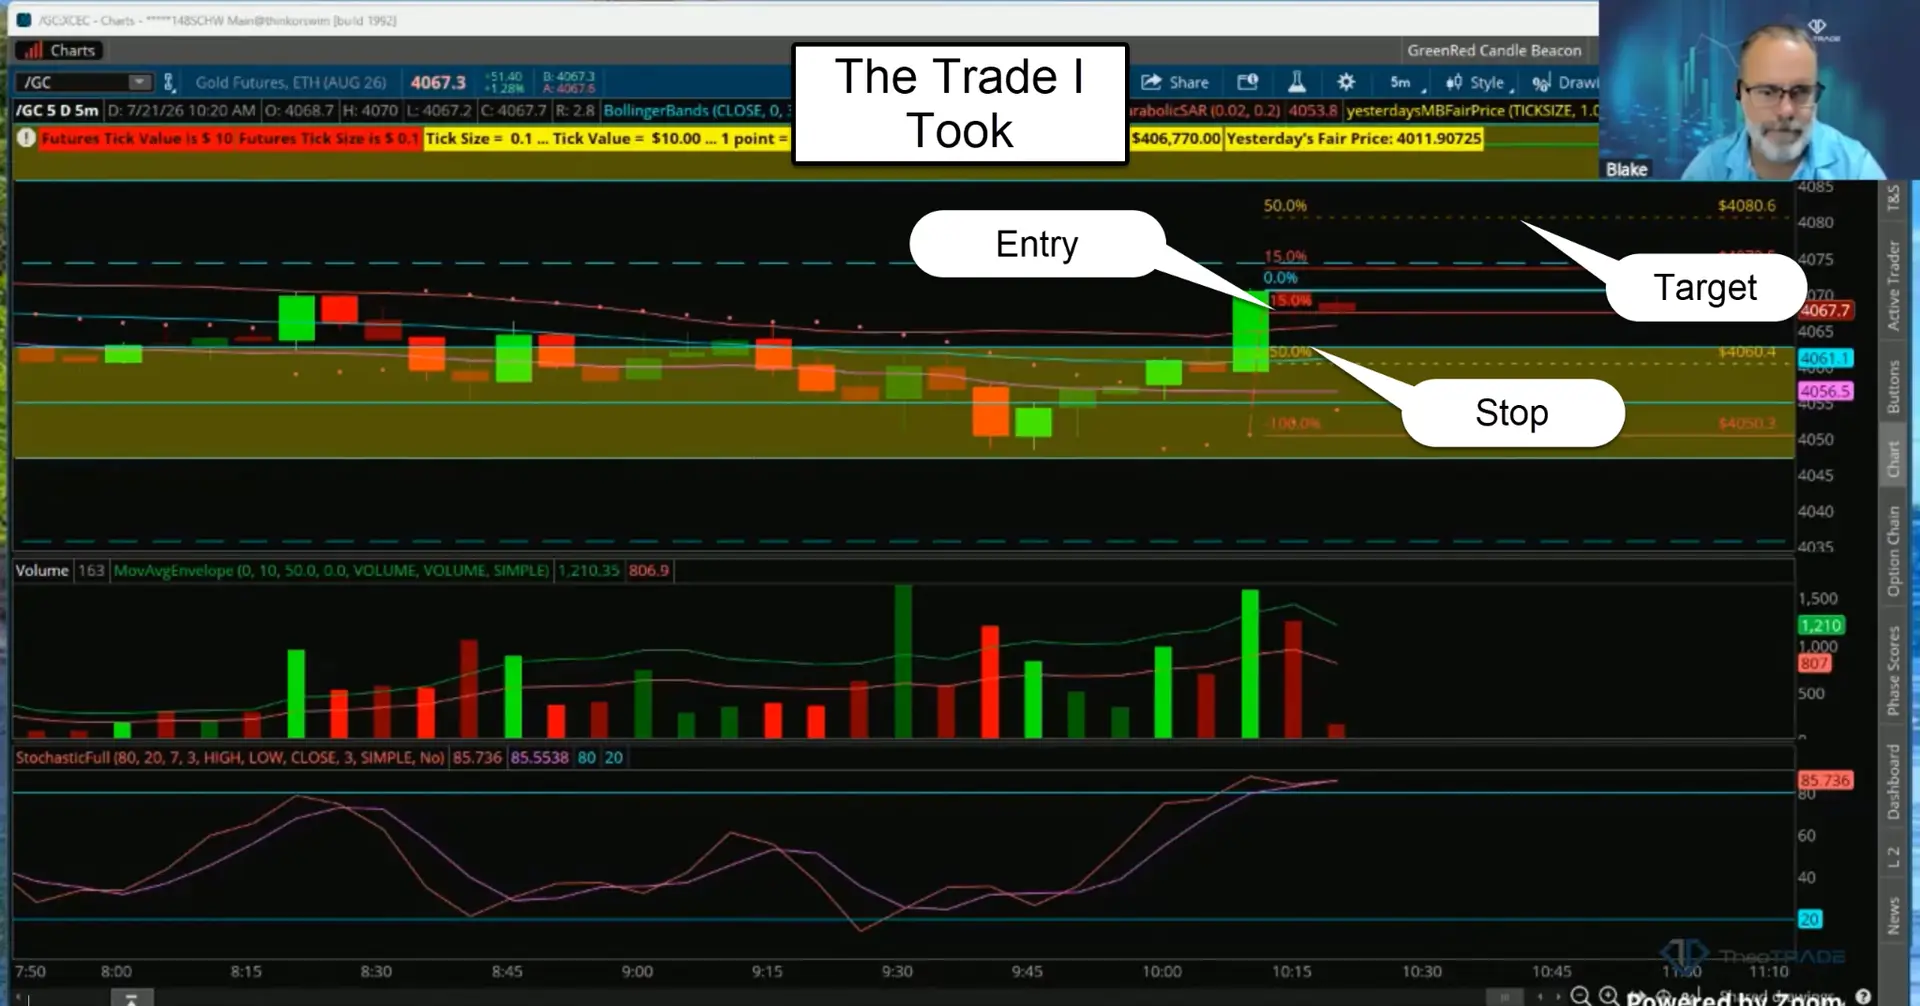
That size told me it was too big for a beacon. It fit the breakout framework instead.
Here is the math I ran live. Roughly $100 of risk per micro for about $200 of reward.
A clean two-to-one. Same risk I would have taken on the beacon, with far more room to run.
Here was the trade setup:
- Setup type: Bollinger Band breakout, not a beacon. The move was too big and too heavy on volume to treat as a beacon, with one candle alone risking about 10.9 points.
- Entry zone: From the breakout close (around 4069) back down to the retest near 4064, valid anywhere down to the low at 4059. The idea was to buy the retest, not chase the close.
- My fill: 4068.3. Others in the room filled better, at 4067 and 4066.3, by resting orders below the market.
- Stop: 4059, just under the low that defined the setup.
- First target: 4080, then I extended it to 4090.7 as the breakout confirmed.
- Risk vs reward: Roughly $100 of risk per micro for about $200 of reward. A clean two-to-one, since 20 points at $10 a point works out to $200 per micro.
My entry window ran from the breakout close back down to the retest near 4064. Anywhere in that band was a fair fill.
On a calm day I’d just take the market. Gold was not calm today.
With the spreads wide and gaps sitting in the tape, I told the room to be greedy on the entry. If price showed 4068, I wanted the buy order resting lower, at 4067.80 or 4067.70.
That small move does two jobs at once. It lowers your cost, and it pulls your stop closer, which shrinks your risk on the very same trade.
It worked. I filled at 4068.3.
Others got in better than me, down at 4067 and 4066.3. They rested the order under the market and let the gaps come to them.
Protecting it once it was on
The trade started climbing, and that is where the real work begins. My rule never changes here.
I do not let a profit run back into a loss.
As gold pushed up, I trailed my stop right behind it. I moved it to 4064, then up to 4065 on the reversal count.
Late in the session I got aggressive and slid it up to 4064 while gold was still rising. My floor kept climbing under the trade, so a sudden reversal could not take the gain away.
Where we closed it out
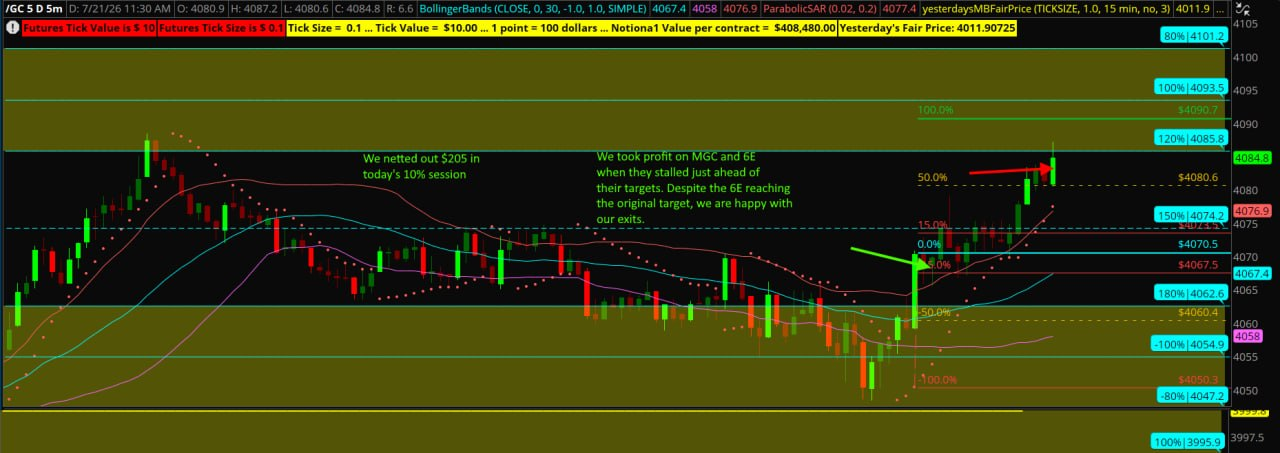
I had to hand off before the trade fully resolved on stream, so the finish comes from the chart I marked up.
Gold stalled just ahead of the 4090.7 target and started hesitating near 4085. I had watched this tape fake people out all morning, so I banked it rather than reach for the last few points.
From fills between 4066 and 4068 up to roughly 4085, we captured about 17 points. The morning finished up $205 net across gold and the euro, and gold carried the load.
Coming off short of the target was fine by me. The setup paid the two-to-one it promised, and the stall handed me a clean reason to step aside.
What I want you to take from this
Here is the heart of it. The market handed me two valid gold signals, and I only took one.
The one I skipped had spent most of its move before it triggered. The one I took still had room to pay me two-to-one.
Run this on your own next gold trade with three moves:
- Skip a signal when its target sits too close to entry. Little reward for full risk is a trade worth passing on.
- Rest your buy order below the market in a wide, gappy tape. A lower fill trims your cost and tightens your stop at the same time.
- Trail your stop as the trade works, and bank it when a volatile move stalls near target.
None of that required me to predict gold. It only required me to pick my spot and protect the trade once it was on.
Your next step
I call every entry, stop, and target before the click, on gold and every market we trade. This morning just gave you a clean look at how I decide which signal earns my money.
Want the full setup, the entry band, and the stop rules in one place?
Learn the complete method in the walkthrough below.
Get the complete beacon walkthrough here.
Pick your spot. Protect the gain.
Blake Young
Senior Market Strategist, TheoTRADE